
Due to the COVID-19 pandemic, people are having an increasing number of online meetings or webinars to attend while working from home. And it is very likely that you need to save a recording of a webinar so you can revisit the creative ideas later. Also, being able to record a webinar can be really useful especially when you want to share and disseminate the content and ideas with your teammates or friends and families. After recording a webinar, they can also catch all the information even if they cannot join the meeting along with you.
To turn a webinar, be it live or pre-made, into evergreen video content, having a screen recording tool is a prerequisite. This tutorial will show you how to record a webinar on Windows and Mac with a proper screen recorder. Additionally, we’ll cover some information about the best webinar platforms you should give them a try. Keep reading!
With a wide selection of screen recording software available, here we’ll recommend a flexible and straightforward screen recording program for recording webinars. FonePaw Screen Recorder is an easy-to-use screen recording app for beginners to create webinar recordings. It also provides some helpful editing options to improve your recordings. Let’s take a quick look at this quality tool and what it offers.

From here, you can begin to capture your screen activity with its built-in Video Recorder. Besides that, you can use Audio Recorder to record your computer’s internal sound or from any microphone you connect to your system.
In addition, if you want to record a video of yourself while recording a webinar, FonePaw Screen recorder has the ability to handle that as well. This software allows you to capture video from your webcam. Also, you will have the option to record a customized region or capture your entire screen. It is worth noting that this program can automatically detect the displays that are attached to your computer. Therefore, it is also convenient for hosts who work with multiple display screens for a webinar when they need to make a webinar beforehand.

Before you start to record a webinar, go to the software’s Preference window, and you may alter the setup to produce a recording of high video and audio quality. FonePaw Screen Recorder supports recording high frame rate videos at 60fps. But normally, the video frame rate for a webinar should not be at this high level, you may set it as 24 fps for creating a recording of a smaller file size.

To improve the user experience, this screen recorder lets you change hotkey settings. And if you make annotations while attending a webinar, you can take advantage of its real-time drawing panels to add shapes and take notes when recording. When a webinar ends, this screen recording software will provide you with some basic editing features enabling you to crop or cut off unnecessary parts. We just found a support article explaining some of the software’s advanced features to record a webinar.
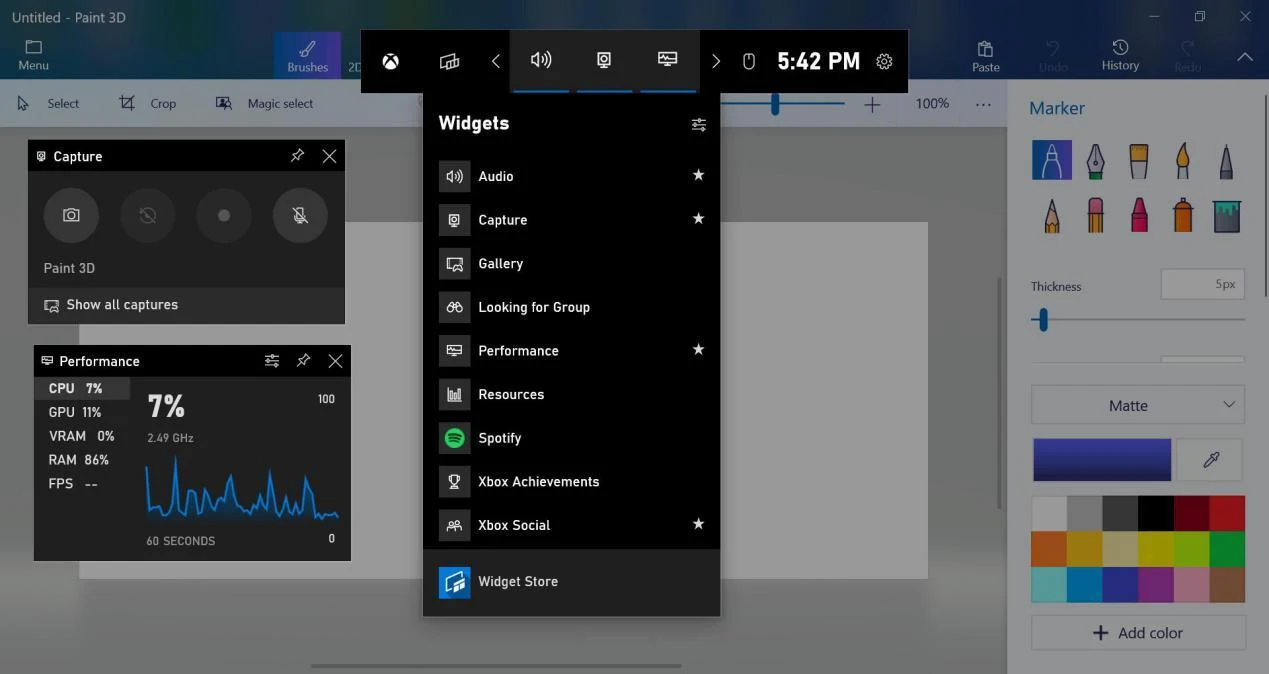
Step 1. Enable the Game Bar. Open the Start Menu and then click on the Gear icon. This will open the Settings app. Then select Gaming. After that, enable the switch to Record game clips, screenshots, and broadcast using Game Bar if it is off.
Step 2. Open the webinar window that you wish to record. And then press Win + G to open the game bar. Several Game Bar widgets will pop up and you will turn off some unneeded widgets.
Step 3. When all is ready, click on the Start Recording button to capture your screen activity. You may also press Win + Alt + R to start recording a webinar.
Step 4. If it is your first time choosing to record screen activity from a specific program, Game Bar may ask for your permission. Then check the box to Enable gaming features for this app to record gameplay. And then hit the Start Recording button again so as to begin screen recording.
Step 5. If you want to stop the recording, just hit the Recording button from the floating bar. And then confirm the notification to proceed. Then File Explorer will open the specific destination folder that saves your webinar recordings.
Just click Record in the control bar to start recording. To stop recording, all you have to do is to click on the Stop icon in the menu bar. You may also use hotkeys to end recording. Press Command + Control + Esc, and then your webinar recording will be saved. The built-in screen recorder on Mac also allows you to trim or share your webinar recordings.
To turn a webinar, be it live or pre-made, into evergreen video content, having a screen recording tool is a prerequisite. This tutorial will show you how to record a webinar on Windows and Mac with a proper screen recorder. Additionally, we’ll cover some information about the best webinar platforms you should give them a try. Keep reading!
How to Record a Webinar
Actually, a screen recording tool has become a popular productivity tool as well as a critical work-from-home gear. You may use it to record a webinar for later review or record an important business meeting or an online class to take notes. What’s more, a good screen recording tool even allows you to record webcam so you may create presentations or educational videos.With a wide selection of screen recording software available, here we’ll recommend a flexible and straightforward screen recording program for recording webinars. FonePaw Screen Recorder is an easy-to-use screen recording app for beginners to create webinar recordings. It also provides some helpful editing options to improve your recordings. Let’s take a quick look at this quality tool and what it offers.
Getting Started with FonePaw Screen Recorder
If you have limited experience in creating a webinar recording, FonePaw Screen Recorder is an ideal place to start. Amazingly, this screen recorder supports both Windows and Mac systems. Once you’ve downloaded and installed the software on your computer, you’ll see its home screen:
From here, you can begin to capture your screen activity with its built-in Video Recorder. Besides that, you can use Audio Recorder to record your computer’s internal sound or from any microphone you connect to your system.
In addition, if you want to record a video of yourself while recording a webinar, FonePaw Screen recorder has the ability to handle that as well. This software allows you to capture video from your webcam. Also, you will have the option to record a customized region or capture your entire screen. It is worth noting that this program can automatically detect the displays that are attached to your computer. Therefore, it is also convenient for hosts who work with multiple display screens for a webinar when they need to make a webinar beforehand.
Before you start to record a webinar, go to the software’s Preference window, and you may alter the setup to produce a recording of high video and audio quality. FonePaw Screen Recorder supports recording high frame rate videos at 60fps. But normally, the video frame rate for a webinar should not be at this high level, you may set it as 24 fps for creating a recording of a smaller file size.
To improve the user experience, this screen recorder lets you change hotkey settings. And if you make annotations while attending a webinar, you can take advantage of its real-time drawing panels to add shapes and take notes when recording. When a webinar ends, this screen recording software will provide you with some basic editing features enabling you to crop or cut off unnecessary parts. We just found a support article explaining some of the software’s advanced features to record a webinar.
Other Workable Solutions to Record Webinars
Apart from third-party tools, you can make use of some built-in tools on your computer to get the recording job done.How to Record a Webinar on Windows
A less known fact is that Windows 10 includes a native screen capture tool called Game Bar specially designed for gamers. Still, you may use it to record webinars. And notice that this tool can only record your whole screen activity. Here’s how it works.Step 1. Enable the Game Bar. Open the Start Menu and then click on the Gear icon. This will open the Settings app. Then select Gaming. After that, enable the switch to Record game clips, screenshots, and broadcast using Game Bar if it is off.
Step 2. Open the webinar window that you wish to record. And then press Win + G to open the game bar. Several Game Bar widgets will pop up and you will turn off some unneeded widgets.
Step 3. When all is ready, click on the Start Recording button to capture your screen activity. You may also press Win + Alt + R to start recording a webinar.
Step 4. If it is your first time choosing to record screen activity from a specific program, Game Bar may ask for your permission. Then check the box to Enable gaming features for this app to record gameplay. And then hit the Start Recording button again so as to begin screen recording.
Step 5. If you want to stop the recording, just hit the Recording button from the floating bar. And then confirm the notification to proceed. Then File Explorer will open the specific destination folder that saves your webinar recordings.
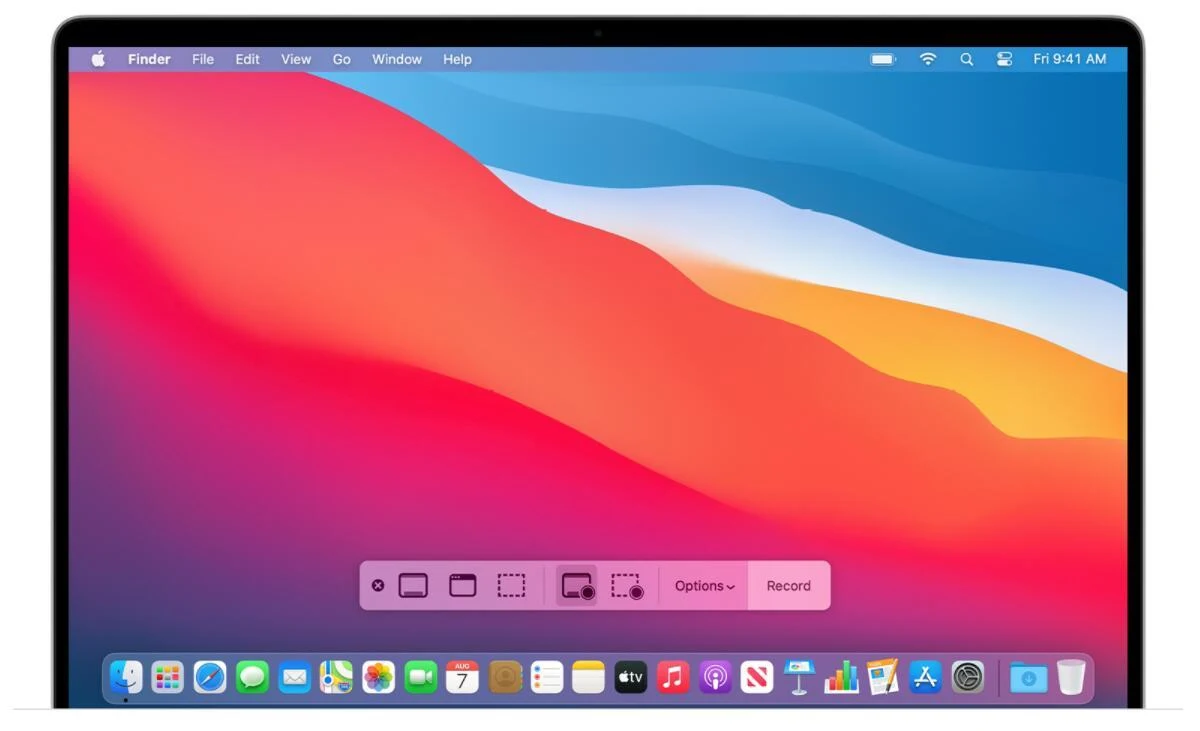
How to Record a Webinar on Mac
Mac users can access a screen recording option from the Finder app. Apart from that, simply press Shift + Command + 5, and then the native Screenshot toolbar will pop up, which gives you the options for recording the entire screen, recording a selected portion of the screen, or just capturing a still image.Just click Record in the control bar to start recording. To stop recording, all you have to do is to click on the Stop icon in the menu bar. You may also use hotkeys to end recording. Press Command + Control + Esc, and then your webinar recording will be saved. The built-in screen recorder on Mac also allows you to trim or share your webinar recordings.