

There are many social media management tools on the market. Choosing the right one can seem like mission impossible, especially if you have multiple profiles to manage. However, there are some tools that stand out among the others, due to their features and affordable pricing.
Hootsuite is one such tool. It’s one of the oldest social media management tools on the market and it offers a whole slew of useful features. It has both free and paid plans and in today’s article, I’ll show you to how to use Hootsuite for powerful social media management.
What is Hootsuite? Why Should You Start Using it?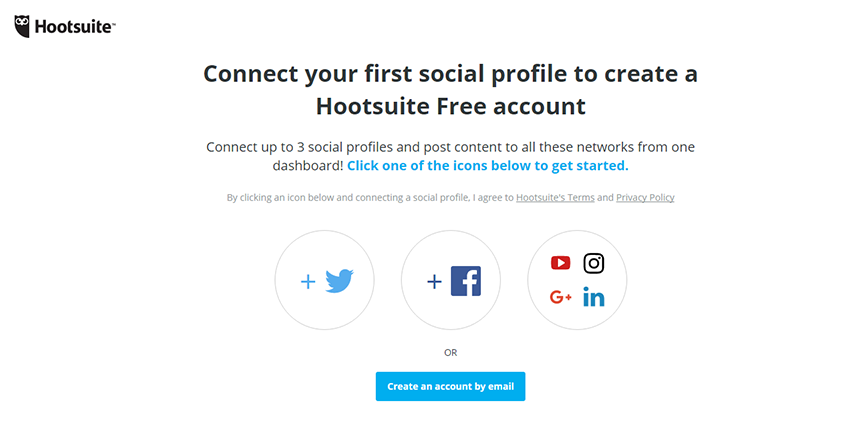
Hootsuite lets you manage your Twitter, Facebook, Google+, Instagram, YouTube, and LinkedIn profiles. It also has support for FourSquare, Pinterest, StumbleUpon, Vimeo, and many other platforms are available via third-party apps. This feature alone makes Hootsuite a very robust tool.
Perhaps the best thing about Hootsuite is its dashboard which can be organized similarly to TweetDeck’s column layout covered in our last article. The difference is that with Hootsuite, you can create streams for each and every social media account you manage.
On top of that, you get access to a set of reports and analytics, scheduling tools, and a few other features that will make your social media marketing a lot easier.
How to Get Started Using HootSuite
1. How to Create an Account
Before you start to use Hootsuite, you will need an account. Navigate to hootsuite.com and click on the Sign up link. You can sign up with your Twitter, Facebook, Google+ account or you can use your email and a password.If you opted to use one of your social media profiles, you’ll be presented with an authorization screen from that particular network. Click on Authorize and then Hootsuite will give you the option to add additional profiles. The free plan will let you add only three accounts while the Pro plan will allow you to add up to 10 social media profiles.
For this walkthrough, I’ve chosen my Twitter account. After Twitter authorization, it will prompt you to enter your email and password and give you the option to add more of your profiles or go straight to the dashboard.
If you select to skip this step, Hootsuite will present your with a blank dashboard with a Wise Guide on the screen which will show you how to connect your accounts, monitor your networks or let you explore on your own.

Since we’ll be walking you through the process here, you can go ahead and click on I’ll explore on my own. The Wise Guide will be put off to the side, showing you the links to quick tutorials which you can access at any time.
2. Connect Your Social Media Profiles
Connecting your social media profiles in Hootsuite is rather easy. All of the settings for Hootsuite are located in the small sidebar menu on the left-hand side. Clicking on your profile picture will take you to a screen where you can add your social media profiles. Simply click on the blue button and select the profile you’d like to add.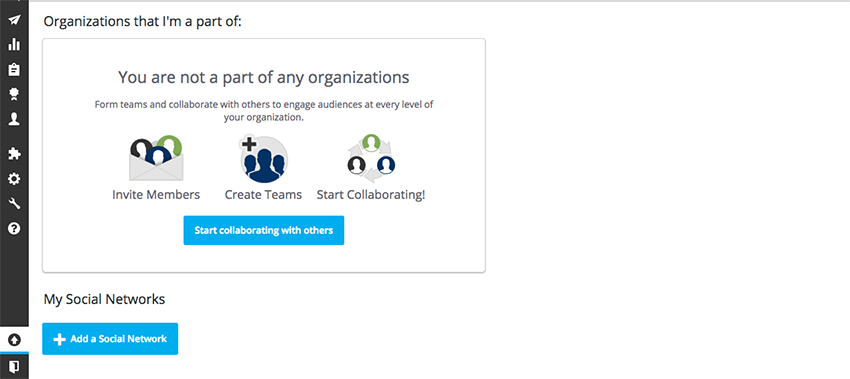
As you can see from the screenshot below, you can connect Twitter, Google+, Facebook, Youtube, Instagram, LinkedIn, and WordPress account.

Facebook will allow you to choose between Pages, Groups or Personal profiles. Bear in mind that you can only add pages and groups where you have an administrator role or you personally own the social account. In a similar fashion, Google+ and LinkedIn will have the option to import your personal profile, pages, and companies.

With LinkedIn and Google+ you can import profiles, pages, and companies as well.
No matter which network you choose, the process is relatively the same: you will be prompted to sign into the network and click on Authorize Hootsuite to access your profile. Simply repeat this process for all the accounts you’d like to manage through Hootsuite.
3. How to Configure Your Settings
Before exploring other options, let’s briefly cover the settings. Clicking on the cogwheel in the sidebar will bring you to the settings screen where you can configure your profile image, enter your email address, and company information.
You can also manage billing and set up a two-factor authentication to make your account more secure. Other options allow you to enter your RSS Feeds, select preferred URL shortener, manage your notifications, and select the times that your status updates should go out when you select the auto-scheduling feature. Go ahead and configure the options to your liking.
The first part controls which accounts the message will get posted to, while the second part is where you can enter your message, upload images, add links, and set the time of posting.
The best part about it is the ability to input your links into the URL box which will automatically shrink them. So a link like this:
https://business.tutsplus.com/articles/hootsuite-vs-buffer-vs-sprout-social-what-is-the-best-social-media-management-tool--cms-27365
will become this:
http://ow.ly/deFH3065CyJ
You can also set your location and set privacy options for Facebook, Google+, and LinkedIn profiles.
Once you’re done composing your message, you have two options.

The same box will also show you the number of characters allowed for each social media network.

While we’re on the subject of teams, bear in mind that this feature is only available on the paid plans, starting with five members on the Team plan. However, you can still assign specific updates to yourself as a reminder.
Now that we’ve covered the basics, let’s explore some of the more advanced features of Hootsuite.

Here you can create certain reports by using one of their preset reports or your can completely customize a report to include metrics that matter to you. A basic Twitter profile overview, Facebook Page overview, and ow.ly click summary are available for free.
More advanced reports require that you purchase “points” in order to run them. Upgrading to a Pro plan will allow you to access one of the more advanced reports for “free.”
Even though advanced and customized reports are a paid feature only, the basic reports are pretty useful to monitor the overall impact of your social messages.
To generate a report simply select the type of report you’d like to run, enter the owner’s name (in most cases that will be you) and click on Generate report. Once the report is generated, you will be able to see your follower growth and the most popular links for that particular account.
2. Content Suggestions
Coming up with great content to share can be a little tricky. Hootsuite has a handy feature which lets you enter up to three keywords that relate to your industry and Hootsuite will pull content from the Internet based on those keywords.
You can then select which links you’d like to schedule and your feed will automatically populate the selected social media accounts at the times you designated in your settings.
You can also add an RSS feed of your blog so that every time you publish a new post, it will automatically get added to your scheduling queue.
3. App Directory
Another notable feature is the App Directory which lets you add various apps to your Hootsuite dashboard. Some are free and some are paid. Among various options, you can add integrations for Google Drive, Dropbox, OneDrive, JIRA service desk, Pocket, Storify, DailyMotion, Gmail, SoundCloud, and others.
This feature is especially handy if you want easy access to photos stored for your social media updates, monitor your email or customer service issues, share your email campaigns from MailChimp, and so much more.
Essentially, it allows you to stay on top of important tasks throughout the day without having to switch between multiple browser tabs.
Hootsuite also offers a browser extension which allows you to share content as you’re browsing the Internet. If you’re using the Pro plan, you can even add the RSS feeds of your favorite blogs by clicking on their RSS icon which will send new content from those networks to pre-selected accounts. You can also set up a new tab for them without specifying a profile, if you’d simply like to stay on top of their content and manually schedule them.
Now that you know how to use Hootsuite, and considering it offers a free beginner plan, we recommend you give it a go if you want to manage more than just your Twitter account.
If you need more options, or tutorials on how to jumpstart your small business social media marketing, then dig into our multi-part, Ultimate Beginner's Guide to Social Media.
Source: tutsplus
No matter which network you choose, the process is relatively the same: you will be prompted to sign into the network and click on Authorize Hootsuite to access your profile. Simply repeat this process for all the accounts you’d like to manage through Hootsuite.
3. How to Configure Your Settings
Before exploring other options, let’s briefly cover the settings. Clicking on the cogwheel in the sidebar will bring you to the settings screen where you can configure your profile image, enter your email address, and company information.
You can also manage billing and set up a two-factor authentication to make your account more secure. Other options allow you to enter your RSS Feeds, select preferred URL shortener, manage your notifications, and select the times that your status updates should go out when you select the auto-scheduling feature. Go ahead and configure the options to your liking.
4. Send and Schedule Multiple Messages
Now that all your profiles are connected and your account is set up, let’s explore how to use Hootsuite to send and schedule your social messages. To send your first message using Hootsuite, simply click on the bar at the top. You will see it has two parts.The first part controls which accounts the message will get posted to, while the second part is where you can enter your message, upload images, add links, and set the time of posting.
You have plenty of options for scheduling messages in Hootsuite.
The best part about it is the ability to input your links into the URL box which will automatically shrink them. So a link like this:
https://business.tutsplus.com/articles/hootsuite-vs-buffer-vs-sprout-social-what-is-the-best-social-media-management-tool--cms-27365
will become this:
http://ow.ly/deFH3065CyJ
You can also set your location and set privacy options for Facebook, Google+, and LinkedIn profiles.
Once you’re done composing your message, you have two options.
- You can send it immediately to all or some of your profiles.
- Or, you can schedule it to go out at the specific time.
The same box will also show you the number of characters allowed for each social media network.
5. How to Set Up Your Streams
One of the best Hootsuite features is the ability to set up completely customized streams so that you can stay on top of the things that matter to you the most. To set up your streams, simply click on the chat box icon in the sidebar. Click on the Add your first tab and then select the social media account you’d like to monitor. For the purposes of this tutorial, I selected Twitter first.Add Various Types of Streams
As you can see, you can add streams for your mentions, messages, retweets, followers, lists, likes, and more. Selecting either one of those will immediately add the stream to your tab. To make it easier to differentiate between tabs, you can double-click the New tab bar and it will let you rename it.Customize Your Streams
The most powerful option is the search stream which allows you to tailor the stream to your needs. By using this option, you can monitor tweets for your brand name, your URL, specific hashtags, or even individual users. This is especially useful when you want to connect with influencers in your industry or stay on top of your competitors.Work with Multiple Tabs
You can add as many streams as you’d like, but be aware that adding more than three streams per tab will cause a scrollbar to appear at the bottom of the window and you will have to scroll left and right to catch up on everything. However, you can add multiple tabs so you can create tabs for each network or for example, create a tab for monitoring a specific set of hashtags or Twitter lists.Engage With Your Streams
Once all your streams are set up, you can then engage with your followers and reply to any tweets and mentions, post comments, like the posts, and more. These options are visible below every message and vary depending on the social media account you’ve set up for your streams.Assign Updates to Team Members
It’s worth mentioning that if you’re working with a team or your social media accounts are part of a team, you can assign updates from other users to members of your team. This comes in handy if you notice a topic that you’d like to cover on your blog, in your newsletter or if you’d like to create a set of your own social media updates concerning that topic.While we’re on the subject of teams, bear in mind that this feature is only available on the paid plans, starting with five members on the Team plan. However, you can still assign specific updates to yourself as a reminder.
Now that we’ve covered the basics, let’s explore some of the more advanced features of Hootsuite.
Advanced Features for Hootsuite Power Users
Aside from scheduling and monitoring, Hootsuite has plenty of other helpful features that aim to make social media management easier. We’ll go over it's powerful analytics and reports, content suggestions, and the app marketplace.1. Analytics and Reports
The analytics feature can be accessed by going to the sidebar and clicking on Analytics.Here you can create certain reports by using one of their preset reports or your can completely customize a report to include metrics that matter to you. A basic Twitter profile overview, Facebook Page overview, and ow.ly click summary are available for free.
More advanced reports require that you purchase “points” in order to run them. Upgrading to a Pro plan will allow you to access one of the more advanced reports for “free.”
Even though advanced and customized reports are a paid feature only, the basic reports are pretty useful to monitor the overall impact of your social messages.
To generate a report simply select the type of report you’d like to run, enter the owner’s name (in most cases that will be you) and click on Generate report. Once the report is generated, you will be able to see your follower growth and the most popular links for that particular account.
2. Content Suggestions
Coming up with great content to share can be a little tricky. Hootsuite has a handy feature which lets you enter up to three keywords that relate to your industry and Hootsuite will pull content from the Internet based on those keywords.
You can then select which links you’d like to schedule and your feed will automatically populate the selected social media accounts at the times you designated in your settings.
You can also add an RSS feed of your blog so that every time you publish a new post, it will automatically get added to your scheduling queue.
3. App Directory
Another notable feature is the App Directory which lets you add various apps to your Hootsuite dashboard. Some are free and some are paid. Among various options, you can add integrations for Google Drive, Dropbox, OneDrive, JIRA service desk, Pocket, Storify, DailyMotion, Gmail, SoundCloud, and others.
This feature is especially handy if you want easy access to photos stored for your social media updates, monitor your email or customer service issues, share your email campaigns from MailChimp, and so much more.
Essentially, it allows you to stay on top of important tasks throughout the day without having to switch between multiple browser tabs.
4. Hootsuite Apps
Last, but not least, let’s go over different Hootsuite apps. Hootsuite is easily accessible through your browser, but it also comes with a mobile app so you can stay on top of things even when you’re on the go. The apps are available for both Android and iOS and are offered for free on the respective marketplaces.Hootsuite also offers a browser extension which allows you to share content as you’re browsing the Internet. If you’re using the Pro plan, you can even add the RSS feeds of your favorite blogs by clicking on their RSS icon which will send new content from those networks to pre-selected accounts. You can also set up a new tab for them without specifying a profile, if you’d simply like to stay on top of their content and manually schedule them.
Hootsuite is Easy to Use and Comes With Powerful Features
Hootsuite offers a powerful set of features to make your social media marketing easier. It’s one of the top three contenders when it comes to social media management and allows you to tailor your social media workflow to your needs.Now that you know how to use Hootsuite, and considering it offers a free beginner plan, we recommend you give it a go if you want to manage more than just your Twitter account.
If you need more options, or tutorials on how to jumpstart your small business social media marketing, then dig into our multi-part, Ultimate Beginner's Guide to Social Media.
Source: tutsplus